

Progress report III
25th April 2006
The past 3 weeks have seen a fair bit of progress on the car. Good thing too, Saturday just gone was the sunniest and warmest it's been for a while and reminded me how nice it's going to be driving around in an open top motor. I just need to get it off the axle stands and on the road!
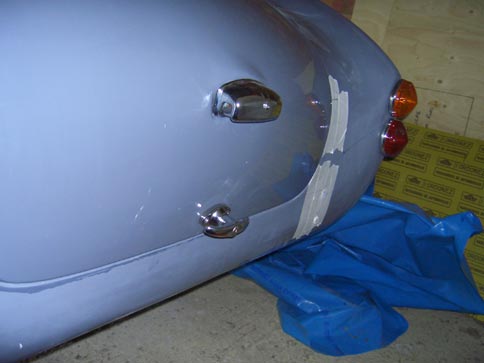
I've spent my time working through the box of bits I have in the garage, trying to get everything on the car that requires cutting holes in the body so I can organise getting it painted. The first bit that came to hand was the rear number plate light. I had originally ordered a plastic version, but I wasn't happy with the quality - it looked and felt cheap (probably because it was only a fiver!). Instead I decided to splash out an eye-watering £15 on a proper chrome-on-brass jobbie which was far more robust. The boot lid already had a recess moulded into it for the light, so it was a just case of making a cardboard template for the bolt holes, drilling them out and attaching the light. Easy stuff, tick that job off the list.
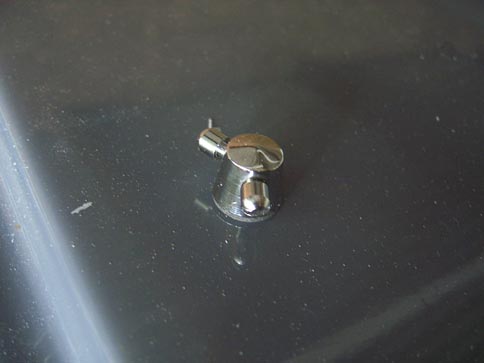
While I had the boot lid to hand I decided to fit the handle and locking mechanism. I had opted for the "budget" lock which is little more than a metal clasp that rotates with the handle. I borrowed the rear numberplate from my tin top to make sure I left enough room on the lid for a plate and marked and drilled the holes for the handle shaft and mounting screws. I used some standard self tappers from B&Q to screw it to the boot lid but being zinc plated and cross headed, they look a bit out of place against the chrome handle. If I can source some stainless steel slotted ones I think that'll look better.
On the inside of the lid I slid the locking clasp onto the shaft and marked and drilled holes for two large self tapping screws. Trying the boot lid back on the car it became clear that the clasp was fouling the rubber boot seal on the body, so I spaced it a few mm off the lid with a couple of washers.
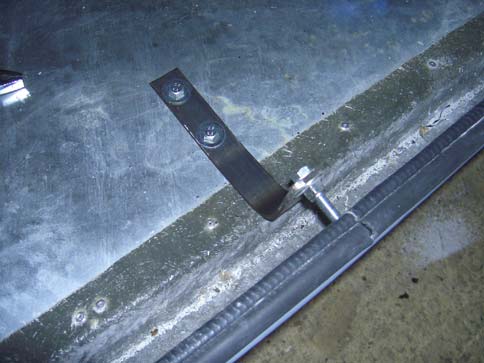
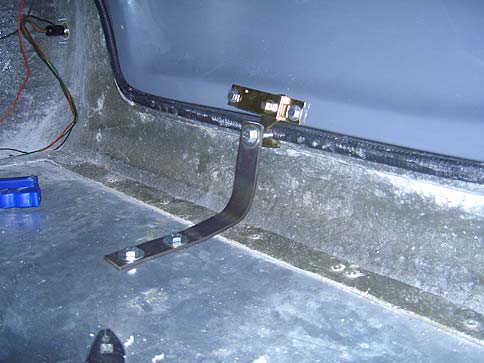
For the lock pin itself I bent a length of 4mm steel into an L-shape and put a nut and bolt through the upright bit to make a pin for the lock to grasp, then attached the bracket to the boot floor with two bolts. Closing the lid and turning the handle produced a satisfying clunk and the lid remained firmly closed.
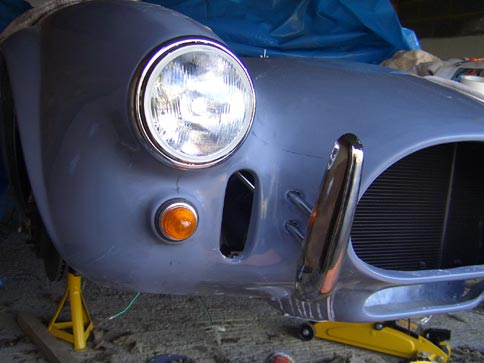
If you remember from last time, I was waiting to see if the parcel I had waiting was the front nudge bar - turns out it was (at last!). To celebrate its arrival, I treated myself to a good hour and a half of wet-n-dry work on the nosecone to remove the very last flashline on the car in preparation of mounting it. (The removal of the final flashline was an achievement in itself, worthy of a small celebration!). Then I cut out the holes either side of the nose for the mounting tubes for the overriders.
The way the nudge bar fits is slightly frustrating in that it bolts to the inside of the overridders, but there are no markings to suggest where the correct location is. After some trial and error and a phone call to the ever-helpful Robin at Pilgrim it transpired that the recommended practice is to line it up on the bench so the top and bottom of the nudge bar line up with the top and bottom of the overriders, then attach it all together and mount it on the car. However, Robin did say that "one side needs to be about 10mm higher than the other" and a post on the forum also mentioned that the nose cone wasn't necessarily perfectly horizontal. I decided to play it safe and mount the overridders first then use a cunning system of masking tape and judgement by eye to get the nudge bar aligned with the nose cone, then mark its position against the overriders. Once drilled and bolted together it looks very good indeed.
Next job was to sort the door locks. I had retrieved a set of locks from a scrap Sierra sometime last autumn, so it was time to dig them out and see if they were any good. For starters, they had central locking motors which needed removing (wonder if I can use them for something else, a powered glovebox lid perhaps!). In addition, the original Sierra handles operated the locks by means of a cable and the recommended Cortina handles work by a solid rod. Having seen some other build diarys I knew it was possible to fit solenoids into the doors to operate the lock mechanism electrically via a push button on the door. This not only removes the need to work out how to attach the cable to a handle designed for a rod, but also adds a wholly unnecessary bling factor to the car, marvellous!
The correct holes were cut in the doors and a template made to drill the holes to mount the stripped down lock mechanisms within them. That done I had to line up the striker pins to mount them to the body. I started by locking the pin into the door lock with the door open and attaching some Blu-tack to the back of the mounting plate. Then I shut the door carefully and held the pin in place while I unlatched the door lock and opened the door again. After marking and drilling the holes, the moment of truth as the drivers door clicked neatly shut into place - result! The passenger side was the same, but because the door is slightly too short for the opening, I had to makea 5mm spacer plate to go between the striker pin and the body.
A simple job next, mounting the washer jets for the windscreen. I had order two jets assuming I would need them, but they turned out to each have two jets outlets on them. Looking at some pictures of the demo car and the Car is Born DVD, it seem that I really only need one mounted centrally on the body. So I measured and drilled a hole for one in the middle of the scuttle, 20mm or so back from the edge of the bonnet. I now have one spare if anyone wants it...
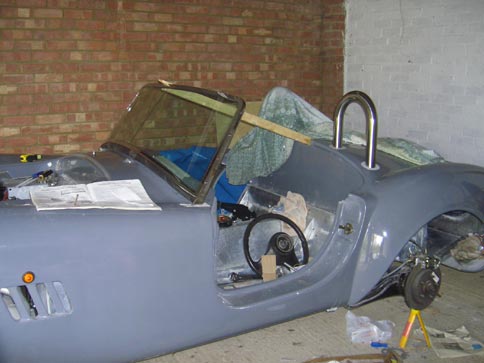
The final job I managed was to trial fit the windscreen. This was ordered a couple of weeks ago from Brasscraft and is a real bit of craftsmanship. Cris at Brasscraft is a proper, old fashioned craftsman who knows really knows his stuff and builds the windscreen frames from scratch by hand. His workshop wouldn't look out of place at the back of a 1930s garage - rows of hand tools and raw materials. There are no mass production techniques, no slotting together component parts from bins of identical bits, everything is produced as a bespoke item. It's utterly fantastic to visit!
I cut the holes for the legs in the body and made a wooden stay to hold the screen at the required 870mm from the rear bulkhead to get the correct rake. The first fitting attempt showed that the door hinge plates were getting in the way of the legs on the screen and preventing it sitting correctly. The screens from Pilgrim have very short legs which means they don't suffer this problem, but Cris had said that shortening the legs on the screen would produce a lot of stress on the mounting bolts, so I decided to keep them the length they were and remove the doors and hinges to help figure out how I could solve the problem. The screen on the car looked very good and after some head scratching and poking about with it in situ I decided the only option would be to chop the top corners off the hinge plates. This I have yet to do this so fingers crossed it'll get round the problem.
So that's where I'm up to. I need to order some exhausts from somewhere and get the steel bent for the harness mountings, then I can mount those, the fuel tank and the fuel filler cap. I've also got the rear bumper to mount then I need to get it sprayed. I still need to work out where that's going to be done, but I have a friend in Nottingham who owns a bodyshop who's keen to do it (at mate's rates), so if I can sort the transport I will probably let him do it.
Next weekend is the Stoneleigh kit car show. This is the first of the big shows of the year so I am going to go along, probably on Bank Holiday Monday, to get some ideas and hopefully meet some of the people I've been emailing and chatting to on the forum. It'll also be a chance to get some show bargins for parts and meet the various suppliers of all the bits I still need to buy. It's going to be a busy and no doubt expensive day!
Handle and light
added to boot lid
Homemade pin
for boot lock
Boot locked
and secure

Yey! No more sanding!
Trial fitting the
overriders...
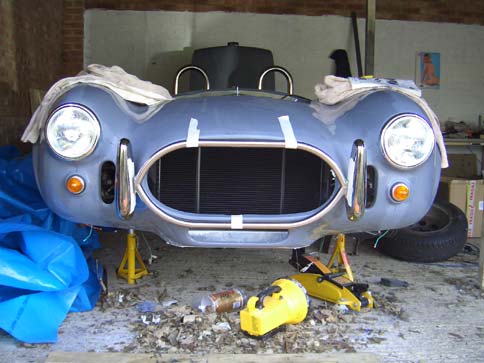
...trial fitting
the nudge bar...
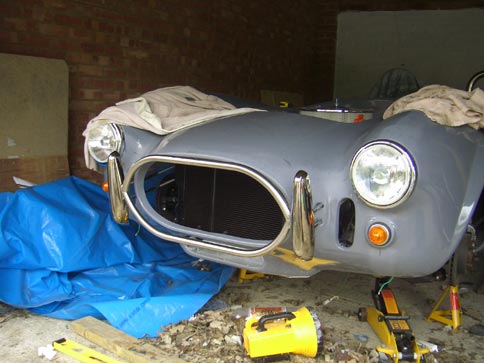
...and all bolted
together nicely

Door locks fitted

Striker pins fitted
(note spacer plate)
Washer jets fitted
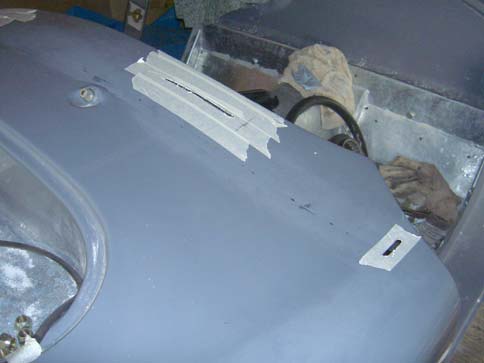
Holes for windscreen
(and heater vents)
Trial fitting
the windscreen